MySQL is a typical Client/Server system, So it is composed of two logical parts a server which provides services and a client, which requests them. The database is on the server and the user will have to use a client to connect to the server in order to use the database.
MySQL's version numbering has an unusual gap: after version 5.7, the next release was 8.0 — versions 6.x and 7.x were never released for MySQL Server. Version 6.0 was abandoned during development, and the 7.x series was used for MySQL Cluster (a separate product). The jump to 8.0 was made to signal the significance of the changes introduced. The current LTS version is 8.4.
In order to use MySQL, you will need the MySQL Server and MySQL Client. When you install MySQL Server,you will get also the command-line client (MySQL Monitor).
You can download the MySQL Server from https://dev.mysql.com/downloads/.
If you are using Windows, you can choose the MySQL Installer for Windows. With that tool, you can install both MySQL Server and MySQL Workbench.
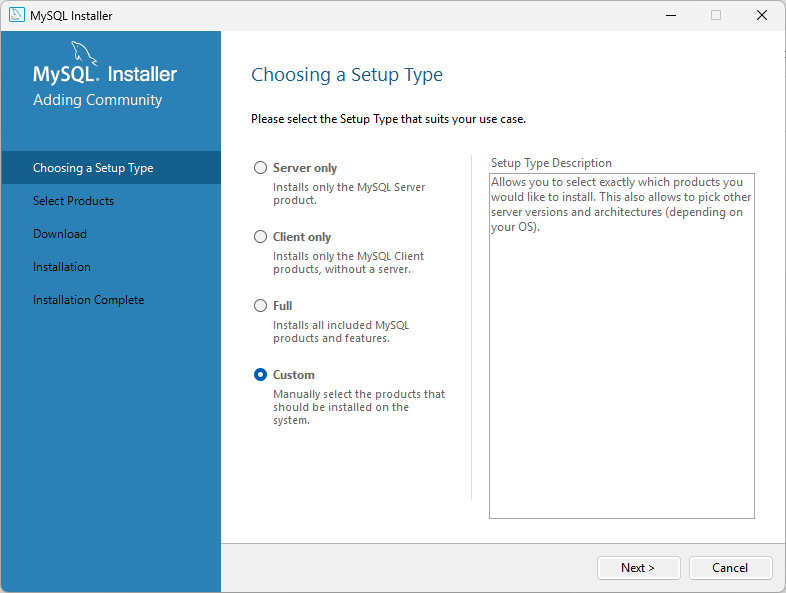
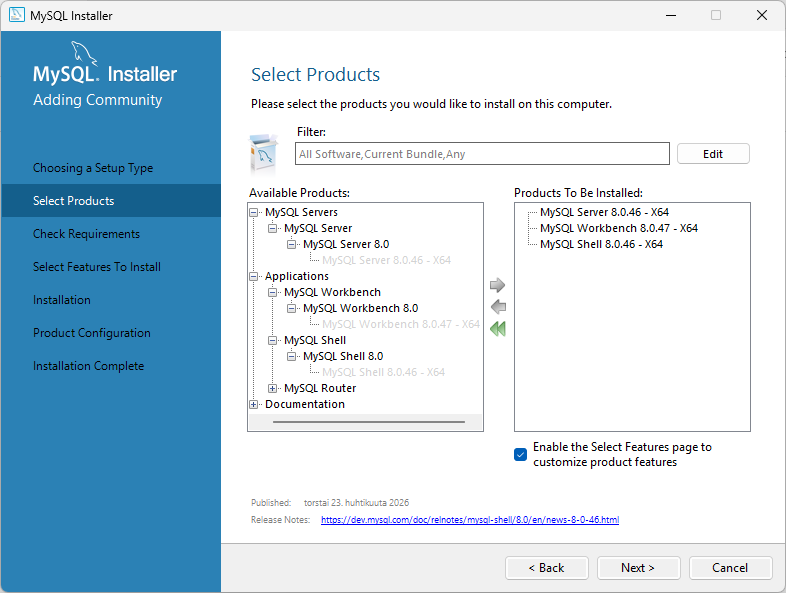
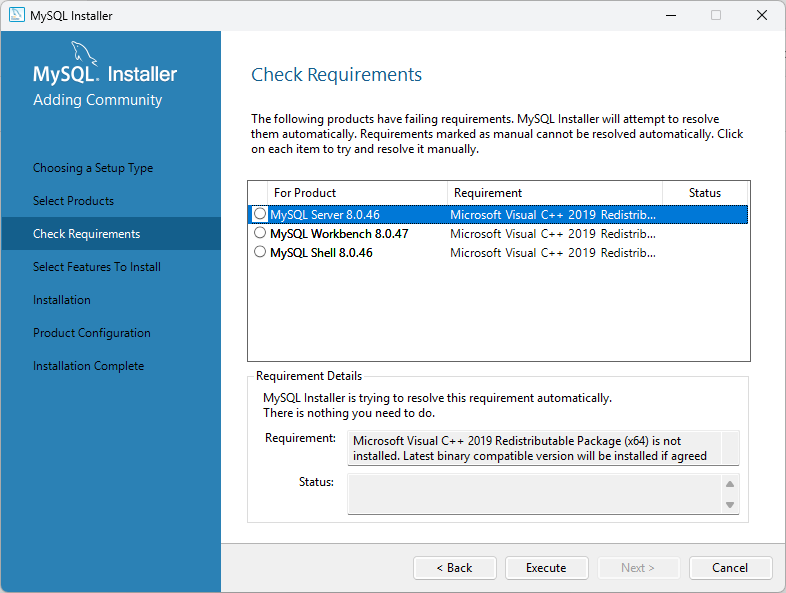
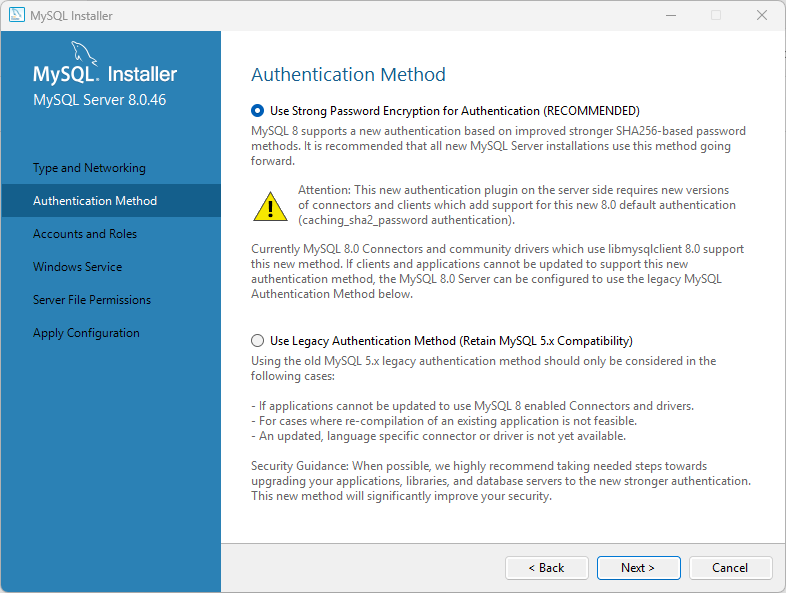
Show installation steps (Step 1–7)
MySQL Installation Steps
- Step 1: Choose Custom
- Step 2: Choose MySQL Server, Workbench, MySQL Shell and click the arrow (MySQL Shell is not necessary)
- Step 3: If you don't have C++ Redistributable, you will get the below view and you have to click Execute
- Step 4: Choose the below options

- Step 5: Choose the below option
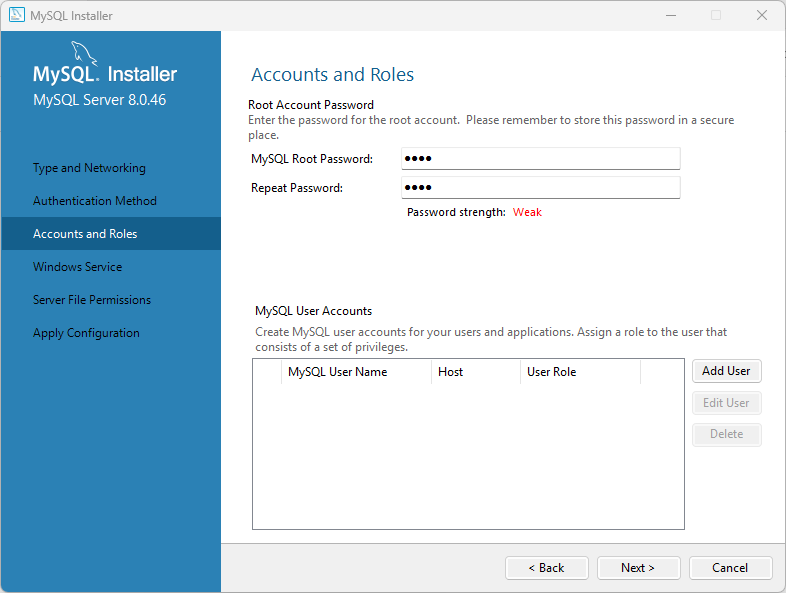
- Step 6: Give a password for MySQL root (you have to remember it later)
- Step 7: Remove the selection Start MySQL Server at System Startup
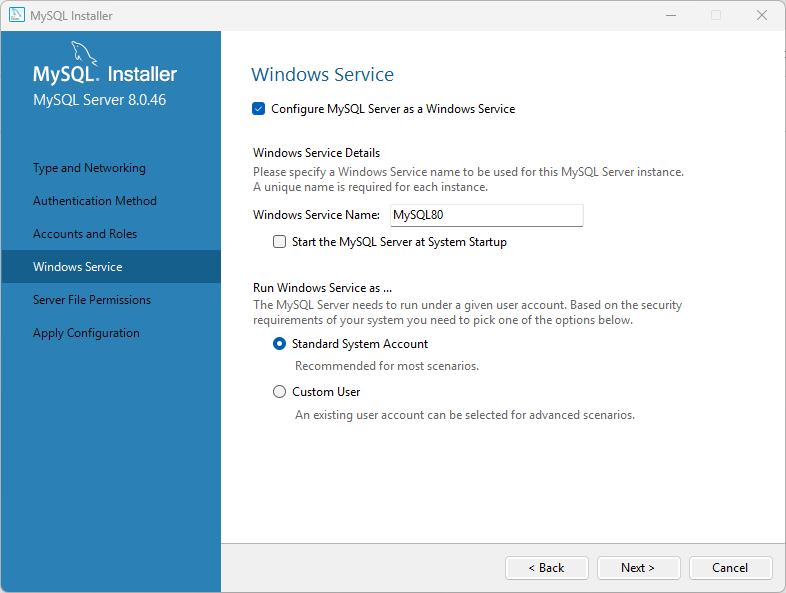
In the installation process Step7, you have set the Windows Service Name for MySQL Server and if you didn't change it the name is MySQL80. In order to start and stop the server you have to
- Open the CommandLine as an Administrator
- To Start the server execute command
net start mysql80 - To Stop the server execute command
net stop mysql80
If you have forgotten the MySQL root password, you can reset it by starting the server temporarily without access control. Open Command Prompt as Administrator and follow these steps:
- Stop the MySQL service:
net stop mysql80
- Start MySQL without access control (leave this window open):
mysqld --skip-grant-tables --shared-memory
- Open a second Command Prompt as Administrator and connect without a password:
mysql -u root
- Re-enable the grant tables so that password changes take effect:
FLUSH PRIVILEGES;
- Set the new root password:
ALTER USER 'root'@'localhost' IDENTIFIED BY 'NewPassword';
- Exit the MySQL client:
EXIT;
- In the first Command Prompt window, stop the temporary mysqld process (press Ctrl+C or run the command below in a third window):
taskkill /F /IM mysqld.exe
- Start the MySQL service normally:
net start mysql80
You can now connect with the new password:
mysql -u root -p
Note: While MySQL is running with --skip-grant-tables, any local user can connect without a password. Perform these steps quickly and do not leave the server in this state unattended.
In order to connect to MySQLServer, you will need some client. The client can be the text based client (mysql monitor) or some graphical client example: MySQLWorkbench, HeidiSQL, SQLYog, DBeaver.
In order to use MySQL Commandline client, you should add below path to your environment variables
C:\Program Files\MySQL\MySQL Server 8.0\bin
In order to connect to MySQL, you have to give these parameters:
- -h hostname (dns-name or ip-address of the server)
- -u username
- -D database (optional)
- -p (if you connect with the password)
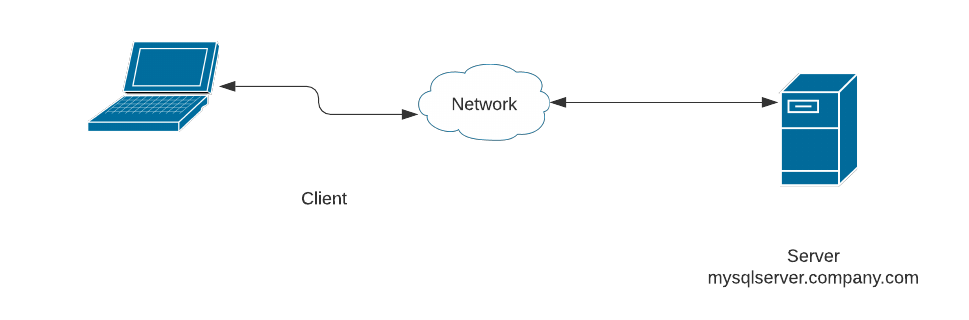
In order to connect from Client to Server the parameters are:
mysql -u mysqlUser -h mysqlserver.company.com -D databasename -p
The default TCP-Port for MySQL is 3306. If your server is using some other port then you have to add the port number to your connection like this
mysql -u username -h hostname -P 8889 -D database -p
You can check which port your server is using with the command
show variables LIKE 'port';
- Session Creation:
After a user logs in using
mysql-client, the MySQL server validates the credentials (username, password, IP, etc.). If successful, the server establishes a session with a unique session ID. - Query Execution:
Each SQL query (
SELECT,INSERT,UPDATE,DELETE, etc.) sent by the client is linked to the established session. The server identifies the session based on its connection ID and executes the query accordingly. - Privilege Checking:
MySQL checks user privileges only once at the start of the session. The server does not revalidate privileges for every query. Instead, it uses the privileges fetched during login.
- Query Processing and Response:
The server processes the query and returns results to the client. If the user’s privileges are modified while the session is active, the changes take effect only after the user logs in again, unless explicitly refreshed with commands like
FLUSH PRIVILEGES.
While you don't need to be a database administrator to develop applications with MySQL, understanding basic server configuration is valuable. The MySQL configuration file contains settings that affect how the server behaves, and some common development issues can be resolved by adjusting these settings.
MySQL server settings are stored in a configuration file:
- Windows:
my.iniin directoryC:\ProgramData\MySQL\MySQL Server 8.0) - Mac/Linux:
my.cnf(locations:/etc/my.cnfor/etc/mysql/my.cnfor~/.my.cnf)
You can find which configuration file MySQL is using with this command:
sc qc MySQL80
Here are the most common settings developers need to modify:
| Setting | Purpose | Example Value |
|---|---|---|
character_set_server |
Default character encoding for the server. Use utf8mb4 to support all Unicode characters including emojis. | character_set_server = utf8mb4 |
collation_server |
Default collation (sorting rules) for the server. | collation_server = utf8mb4_unicode_ci |
max_allowed_packet |
Maximum size of a single packet/query. Increase if you work with large files (images, BLOBs) or long SQL queries. | max_allowed_packet = 64M |
default_authentication_plugin |
Default authentication method for new users (see Authentication plugin section). | default_authentication_plugin = mysql_native_password |
bind-address |
IP address MySQL listens on. Default 127.0.0.1 (IPv4 localhost only) or ::1 (IPv6 localhost). Use 0.0.0.0 to allow connections from any IPv4 address, or :: for any IPv6 address. Warning: Only use 0.0.0.0 or :: in development environments, not in production without proper firewall rules. |
bind-address = 0.0.0.0 bind-address = 0.0.0.0,::1 |
port |
TCP port the MySQL server listens on. | port = 3306 |
max_connections |
Maximum number of simultaneous client connections. | max_connections = 151 |
Steps:
- Open the configuration file (
my.iniormy.cnf) in a text editor with administrator/root privileges - Find the
[mysqld]section (server settings) - Add or modify settings under
[mysqld]:[mysqld] character_set_server = utf8mb4 collation_server = utf8mb4_unicode_ci max_allowed_packet = 64M
- Save the file
- Restart MySQL server for changes to take effect
You can check current server settings without editing the configuration file:
-- Show all variables
SHOW VARIABLES;

-- Show specific variable
SHOW VARIABLES LIKE 'character_set%';
SHOW VARIABLES LIKE 'max_allowed_packet';

-- Show current character sets in use
SHOW VARIABLES LIKE '%character%';
- Backup first: Always make a backup copy of the configuration file before editing
- Syntax matters: Incorrect syntax can prevent MySQL from starting. If MySQL won't start after changes, restore the backup.
- Comments: Use
#or;at the start of a line for comments - Testing: Test configuration changes in a development environment before applying to production
- Not all settings are in the file: If a setting isn't in the file, you can add it under the
[mysqld]section
This is a very short manual to MySQL, you can found more details example from https://dev.mysql.com/doc/refman/8.0/en/mysql-commands.html
| Action | Command |
|---|---|
| Create a new database | mysql> create database databasename; |
| List all databases | mysql> show databases; |
| Change the default database | mysql> use databasename; |
| List the tables in the database | mysql> show tables; |
| Check the structure of the table | mysql> describe tablename; |
| Delete a database | mysql> drop database databasename; |
| Delete a table | mysql> drop table tablename; |
| Change password |
mysql> SET PASSWORD=PASSWORD('new_password'); in MYSQL 8 mysql> SET PASSWORD='new_password'; |
| Change password to another user | mysql> ALTER USER username@host IDENTIFIED BY 'newpassword'; |
| Check the engines of your tables | mysql> show table status; |
| Check the engines in server | mysql> show engines; |
The following animation demonstrates how to use basic MySQL commands in the MySQL console:
Key takeaways from the demonstration:
- SHOW DATABASES: Lists all available databases on the server
- CREATE DATABASE: Creates a new database
- USE database: Switches to a specific database to work with it
- SHOW TABLES: Lists all tables in the current database
- DESCRIBE table: Shows the structure and columns of a table
- SHOW ENGINES: Displays available storage engines and their properties
- DROP TABLE/DATABASE: Permanently deletes a table or database
There might be differences between different MySQL-server versions.
| Type | Size | Description | Common Use Cases |
| CHAR[Length] | Length bytes | A fixed-length field from 0 to 255 characters long. | Fixed-length codes (country codes: 'FI', 'SE', postal codes, phone prefixes) |
| VARCHAR(Length) | String length + 1 bytes | A variable-length field from 0 to 65,535 characters long. | Names, email addresses, usernames, short descriptions |
| TINYTEXT | String length + 1 bytes | A string with a maximum length of 255 characters. | Short text snippets (rarely used, VARCHAR is usually preferred) |
| TEXT | String length + 2 bytes | A string with a maximum length of 65,535 characters. | Product descriptions, blog post content, comments |
| MEDIUMTEXT | String length + 3 bytes | A string with a maximum length of 16,777,215 characters. | Long articles, documentation, large text content |
| LONGTEXT | String length + 4 bytes | A string with a maximum length of 4,294,967,295 characters. | Very large text data, entire books, JSON documents |
| TINYINT[Length] | 1 byte | Range of -128 to 127 or 0 to 255 unsigned. | Boolean flags (0/1), small counters, age, status codes (1-10) |
| SMALLINT[Length] | 2 bytes | Range of -32,768 to 32,767 or 0 to 65535 unsigned. | Year values, quantity in stock, port numbers |
| MEDIUMINT[Length] | 3 bytes | Range of -8,388,608 to 8,388,607 or 0 to 16,777,215 unsigned. | Population counts, medium-size counters (rarely used) |
| INT[Length] | 4 bytes | Range of -2,147,483,648 to 2,147,483,647 or 0 to 4,294,967,295 unsigned. | Primary keys (ID), foreign keys, most numeric data |
| BIGINT[Length] | 8 bytes | Range of -9,223,372,036,854,775,808 to 9,223,372,036,854,775,807 or 0 to 18,446,744,073,709,551,615 unsigned. | Large IDs (e.g., Twitter/X post IDs), timestamps in milliseconds |
| FLOAT | 4 bytes | A small number with a floating decimal point. | Scientific calculations, measurements (avoid for currency!) |
| DOUBLE[Length, Decimals] | 8 bytes | A large number with a floating decimal point. | Coordinates (latitude/longitude), scientific data (avoid for currency!) |
| DECIMAL[Length, Decimals] | Length + 1 or Length + 2 bytes | A DOUBLE stored as a string, allowing for a fixed decimal point. | Currency/money values, prices, balances (exact decimal arithmetic) |
| DATE | 3 bytes | In the format of YYYY-MM-DD. | Birth dates, deadlines, event dates (no time needed) |
| DATETIME | 8 bytes | In the format of YYYY-MM-DD HH:MM:SS. | Scheduled events, appointments (fixed time, no timezone conversion) |
| TIMESTAMP | 4 bytes |
In the format of YYYYMMDDHHMMSS. (In older MySQL-servers there is Year 2038 problem) |
Created_at, updated_at, logs (auto-converts to session timezone) |
| TIME | 3 bytes | In the format of HH:MM:SS | Opening hours, duration, time of day (no date needed) |
| ENUM | 1 or 2 bytes | Short for enumeration, which means that each column can have one of several possible values. | Status fields ('active', 'inactive', 'pending'), gender, priority levels |
| SET | 1, 2, 3, 4, or 8 bytes | Like ENUM except that each column can have more than one of several possible values. | Tags, permissions, features ('read', 'write', 'delete') |
Storage engines are MySQL components that handle the SQL operations for different table types. InnoDB is the default and most general-purpose storage engine, and Oracle recommends using it for tables except for specialized use cases.
When you create a table, you have to design which table type you are going to use. The various storage engines provided with MySQL are designed with different use cases in mind.
You can use below command to check which engines your server supports:
SHOW ENGINES\G
And below command will show what are the table types in your database:
SHOW TABLE STATUS\G
Here are some table types and their properties:
| Type | Properties |
|---|---|
| InnoDB | InnoDB is a transaction-safe (ACID compliant) storage engine for MySQL that has commit, rollback, and crash-recovery capabilities to protect user data. InnoDB row-level locking (without escalation to coarser granularity locks) and Oracle-style consistent nonlocking reads increase multi-user concurrency and performance. InnoDB stores user data in clustered indexes to reduce I/O for common queries based on primary keys. To maintain data integrity, InnoDB also supports FOREIGN KEY referential-integrity constraints |
| MyISAM | These tables have a small footprint. Table-level locking limits the performance in read/write workloads, so it is often used in read-only or read-mostly workloads in Web and data warehousing configurations. |
| Memory | Stores all data in RAM, for fast access in environments that require quick lookups of non-critical data. This engine was formerly known as the HEAP engine. Its use cases are decreasing; InnoDB with its buffer pool memory area provides a general-purpose and durable way to keep most or all data in memory, and NDBCLUSTER provides fast key-value lookups for huge distributed data sets. |
You can backup databases and tables with MySqlDump. It is very simple application, which will create the sql-code that you can use to create the databases and tables with the data.
Example Below command will backup Project database to file project.sql
mysqldump -u root Project -p > project.sqlExample Below command will backup Project database to file project.sql including also the stored procedures
mysqldump -u root Project -p --routines > project.sqlAnd the next command will backup only the table Book
mysqldump -u root Project Book -p >book.sqlAnd then you can use those codes to return your database and tables.
Example You can execute the code from "mybackup.sql" to database Project with this command
mysql -u root -D Project -p < mybackup.sql
When a database is exported to another MySQL server using a dump file, different character encodings can cause an error. In such cases, it is advisable to remove those annotations from the dump file. This can be done, for example, by executing the following command:
sed -E 's/DEFAULT CHARSET=[a-zA-Z0-9_]+//g; s/COLLATE=[a-zA-Z0-9_]+//g' source.sql > target.sql
You can also use MySQL Workbench to handle the dump-files. In the Server menu there is option Data Export, which will create the dump-file and option Data Import will execute the commands from dump file.
MySQL server has a special database called mysql, which is a system database. It contains metadata about the server configuration, including:
- user - user accounts and global privileges
- db - database-level privileges
- tables_priv - table-level privileges
- time_zone_name - time zone information
Important: You should NOT modify tables in the mysql database directly.
Instead, use SQL commands like CREATE USER, GRANT, REVOKE,
etc. Direct modifications can corrupt the system and cause authentication problems.
User management is easiest to handle with some graphical client as MySQLWorkbench, dBForgeStudio or HeidiSQL. But it is still useful to know the basic things behind this system.
MySQL stores all user information to table user inside database mysql.
You can check which users you have in your server, like this:
SELECT User FROM mysql.user;
So the table is user and there is a column named User.
And if you want to check also which are the allowed hosts for the users, you use can this:
SELECT User,Host FROM mysql.user;
You can create new user, which can connect from localhost like this
CREATE USER 'testuser'@'localhost' IDENTIFIED BY 'test_pass';
You can create new user, which can connect from everywhere like this
CREATE USER 'testuser'@'%' IDENTIFIED BY 'test_pass';
You can create new user, which can connect from domain mydomain.com like this
CREATE USER 'testuser'@'%.mydomain.com' IDENTIFIED BY 'test_pass';
If you want to set the authentication to mysql_native_password, you can create the user like this
CREATE USER 'netuser'@'localhost' IDENTIFIED WITH mysql_native_password BY 'netpass';
MySQL supports different authentication plugins, for example:
- mysql_native_password - Older plugin, widely compatible with legacy applications
- caching_sha2_password - Default in MySQL 8.0+, more secure but requires newer client libraries
Why it matters: Some older applications or client libraries may not support caching_sha2_password and will fail to connect. In those cases, you need to either update the client or use mysql_native_password.
If you don't set it in the CREATE USER command, MySQL will use the default of your server. You can check what is the default in your server with the command:
SHOW VARIABLES LIKE '%default_authentication%';You can set mysql_native_password as the default by adding below line to my.cnf (Mac, Linux) or to my.ini (Windows):
default_authentication_plugin=mysql_native_password
You can use Grant commands to manage users privileges.
Below command will add SELECT privileges to all tables in database Project to user testman, if he connects from localhost.
GRANT SELECT ON Project.* TO 'testman'@'localhost';Below command will add SELECT and INSERT privileges to all tables in database Project to user testman, if he connects from localhost.
GRANT SELECT,INSERT ON Project.* TO 'testman'@'localhost';Below command will add EXECUTE privilege to procedure debit_transfer in database Project to user testman, if he connects from localhost.
GRANT EXECUTE ON Project.debit_transfer TO 'testman'@'localhost';Below command will add all privileges to all tables in database Project to user testman, if he connects from localhost.
GRANT ALL ON Project.* TO 'testman'@'localhost';Below command will show which privileges user testman has, if he connects from localhost.
SHOW GRANTS FOR 'testman'@'localhost';
Below command will remove SELECT privileges to all tables in database Project to user testman, if he connects from localhost.
REVOKE SELECT ON Project.* FROM 'testman'@'localhost';Below command will remove SELECT and INSERT privileges to all tables in database Project to user testman, if he connects from localhost.
REVOKE SELECT,INSERT ON Project.* FROM 'testman'@'localhost';Below command will remove all privileges to all tables in database Project to user testman, if he connects from localhost.
REVOKE ALL ON Project.* FROM 'testman'@'localhost';
You can delete the the user with below command
DROP USER 'testman'@'localhost';
MySQL Workbench is a unified visual tool for database architects, developers, and DBAs. MySQL Workbench provides data modeling, SQL development, and comprehensive administration tools for server configuration, user administration, backup, and much more. MySQL Workbench is available on Windows, Linux and Mac OS X.
You can find a tutorial for using MySQLWorkbench from https://www.guru99.com/introduction-to-mysql-workbench.html
And the manual for MySQLWorkbench from https://dev.mysql.com/doc/workbench/en/
Windows installation note: MySQL Workbench requires Microsoft Visual C++ Redistributable to be installed. If Workbench fails to start or shows DLL errors (VCRUNTIME140.dll, MSVCP140.dll), download and install the latest Visual C++ Redistributable from Microsoft.
For detailed installation instructions, see the official installation guide.
SSL/TLS (Secure Sockets Layer / Transport Layer Security) encrypts the data sent between a MySQL client and server, protecting credentials and query results from interception. MySQL 8.0 and MariaDB 10.4+ enable SSL by default — understanding how it works is essential for any production deployment.
Without SSL, all data travelling between your application and the MySQL server is sent in plain text. This means:
- Passwords are visible to anyone on the network path
- Query results (including sensitive rows) can be read or modified in transit
- Cloud and hosted databases (AWS RDS, Azure Database, Google Cloud SQL) require or strongly recommend SSL
SSL encrypts the entire connection so that even if traffic is intercepted, it cannot be read.
You can verify whether your MySQL server has SSL enabled and which cipher is in use:
-- Check if SSL is active for the current connection
SHOW STATUS LIKE 'Ssl_cipher';

-- List all SSL-related status variables
SHOW STATUS LIKE 'Ssl%';

-- Check server-level SSL configuration
SHOW VARIABLES LIKE '%ssl%';
If Ssl_cipher returns a non-empty value (e.g., TLS_AES_256_GCM_SHA384), the connection is encrypted. An empty value means the connection is unencrypted.
You can enforce SSL at the user level so that the account cannot connect without an encrypted connection:
-- Require SSL when creating a new user
CREATE USER 'appuser'@'%' IDENTIFIED BY 'password' REQUIRE SSL;

-- Add SSL requirement to an existing user
ALTER USER 'appuser'@'%' REQUIRE SSL;

-- Verify the requirement
SELECT user, host, ssl_type FROM mysql.user WHERE user = 'appuser';
After REQUIRE SSL is set, any attempt to connect without SSL will be refused with an access denied error.
When connecting from the command line you can control the SSL mode with the --ssl-mode option:
-- Require an encrypted connection (recommended for remote servers)
mysql --ssl-mode=REQUIRED -h db.example.com -u appuser -p

-- Verify the server certificate as well (most secure)
mysql --ssl-mode=VERIFY_CA --ssl-ca=/path/to/ca.pem -h db.example.com -u appuser -p

-- Disable SSL (only for local development on trusted networks)
mysql --ssl-mode=DISABLED -h localhost -u root -p
| ssl-mode value | Behaviour |
|---|---|
PREFERRED |
Use SSL if available, fall back to plain text (default) |
REQUIRED |
Always use SSL; fail if the server does not support it |
VERIFY_CA |
Require SSL and verify the server certificate against a CA |
VERIFY_IDENTITY |
Require SSL, verify CA, and check that the hostname matches the certificate |
DISABLED |
Never use SSL |
When connecting from a Node.js / Express application with the mysql2 package, pass the SSL options in the connection configuration:
const mysql = require('mysql2');
const fs    = require('fs');

const pool = mysql.createPool({
    host    : 'db.example.com',
    user    : 'appuser',
    password: 'password',
    database: 'mydb',
    waitForConnections: true,
    connectionLimit   : 10,
    ssl: {
        ca: fs.readFileSync('/path/to/ca.pem'),
        rejectUnauthorized: true   // verify server certificate
    }
});

// Confirm the connection is encrypted
pool.query("SHOW STATUS LIKE 'Ssl_cipher'", (err, results) => {
    console.log(results[0].Value); // e.g. TLS_AES_256_GCM_SHA384
});
Set rejectUnauthorized: false only if your cloud provider uses a self-signed certificate and you cannot supply the CA file — it disables certificate verification and should not be used in production.
Cloud providers (AWS RDS, Azure, Google Cloud SQL) publish their CA certificate files in their documentation.
When creating or editing a connection in MySQL Workbench, open the SSL tab. You can choose between three modes:
- No — SSL disabled
- If available — use SSL if the server supports it (default)
- Require — refuse the connection if SSL is not available
For connections to cloud databases, paste the path to the CA file provided by your cloud vendor into the SSL CA File field and set the mode to Require.
Managing time zones correctly in a MySQL server is critical for applications that rely on accurate timekeeping across different regions or time-sensitive operations. MySQL supports time zone conversions, but the server must be properly configured to use named time zones (like Europe/Helsinki), especially in international environments.
Setting the correct time zone ensures consistency in how time-related data is stored and retrieved. If the server's time zone differs from the application's or user's time zone, it can lead to confusing data mismatches, incorrect reporting, and even critical errors in systems like logging, scheduling, or financial transactions.
The TIMESTAMP data type in MySQL is time zone-aware. It stores values in UTC internally and automatically converts them to the session's time zone when queried. This makes it suitable for multi-user systems where users are in different time zones.
In contrast, DATETIME stores the value exactly as given, without any time zone conversion, which can be useful when the time is fixed and not relative to any time zone (e.g., a historical event).
When you query a TIMESTAMP field, the time displayed depends on the MySQL session time zone setting, not the client computer's time zone. The same stored time will appear different to users in different sessions if they have different time zone settings.
Example:
-- Session 1: In Finland (Europe/Helsinki, UTC+2)
SET time_zone = 'Europe/Helsinki';
INSERT INTO logs (event_time) VALUES (NOW());  -- Inserts: 2024-12-31 15:00:00
-- MySQL stores internally: 2024-12-31 13:00:00 UTC

-- Session 2: In New York (America/New_York, UTC-5)
SET time_zone = 'America/New_York';
SELECT event_time FROM logs;  -- Displays: 2024-12-31 08:00:00

-- Session 3: In Finland
SET time_zone = 'Europe/Helsinki';
SELECT event_time FROM logs;  -- Displays: 2024-12-31 15:00:00
Important: The client computer's time zone does not automatically affect the displayed time. Your client application must explicitly set the session time zone when connecting to MySQL.
Example in Node.js (mysql2):
const mysql = require('mysql2');
const connection = mysql.createConnection({
  host: 'localhost',
  user: 'root',
  password: 'password',
  database: 'mydb',
  timezone: 'Europe/Helsinki'  // Sets session time zone
});
Example in PHP (PDO):
$db = new PDO('mysql:host=localhost;dbname=mydb', 'root', 'password');
$db->exec("SET time_zone = 'Europe/Helsinki'");
If you don't set the session time zone explicitly, MySQL uses the server's default time zone, which may not match your users' locations.
The TIMESTAMP data type is ideal when you need to track events relative to time zones or log actions with precision in a global context. Because TIMESTAMP values are stored in UTC and automatically converted to the session’s time zone, they are particularly useful in multi-user systems where users operate in different geographic regions.
It's commonly used for tracking record creation and update times (e.g., created_at, updated_at) in web applications, logging systems, or auditing changes where the exact moment an event occurred is more important than how it appears in a fixed time zone.
Note that in older versions of MySQL (up to 8.0), TIMESTAMP has a limited date range, supporting only dates between 1970 and 2038 due to its 32-bit Unix time representation. If you need to store dates outside that range such as future appointments, contracts, or historical records DATETIME is a safer and more flexible choice.
You can first check if the time zone is already active in your server, by executing command
SELECT name FROM mysql.time_zone_name;If the result is not empty, it is active. If it is not active, you can fix it like this:
- Download file (timezone_2025b_posix_sql.zip) from https://dev.mysql.com/downloads/timezones.html
- Extract the zip file to a folder of your choice, e.g.
C:\temp\timezone - Open Command Prompt or PowerShell as Administrator
- Navigate to the folder: cd C:\temp\timezone
- Execute command mysql -u root -p mysql < timezone_posix.sql
Then you can use the Time Zone in SELECT-queries like this:
SELECT CONVERT_TZ(NOW(), 'UTC', 'Europe/Helsinki') AS 'Finnish_time';
SELECT CONVERT_TZ(NOW(), 'UTC', 'Europe/Stockholm') AS 'Swedish_time';
In Linux, you can activate Time Zones, by giving below command
mysql_tzinfo_to_sql /usr/share/zoneinfo | mysql -u root -p mysql